What is Arduino (Arduino UNO) and what are its components in the Internet of Things?
- Arduino is an open-source electronics platform that uses simple hardware and software to make it easy to use.
- Arduino boards can take inputs - such as light from a sensor, a finger on a button, or a Twitter tweet - and convert them to outputs - such as turning on an LED, triggering a motor, or posting anything online.
- By providing a set of instructions to the board's microcontroller, you may tell it what to do. The Arduino programming language (based on Wiring) and the Arduino Software (IDE) (based on Processing) are used to do this.
- Thousands of projects have used Arduino throughout the years, ranging from simple household items to complicated scientific apparatus.
- This open-source platform has united a global community of makers - students, amateurs, artists, programmers, and professionals - whose contributions have added up to an enormous quantity of accessible information that may be of tremendous benefit to novices and specialists alike.
- The Arduino serves as the system's brain and processes data from the sensor.
- Arduino is an open source hardware platform that beginners and enthusiasts all around the world may use to create projects.
- It includes an ATMEGA micro-controller that processes data and ensures the IoT system's proper operation.
- And the best part is that the Arduino can be programmed an unlimited number of times, allowing you to create a variety of IoT projects by just altering a few lines of code.
- Arduino programming necessitates the usage of the C++ programming language.
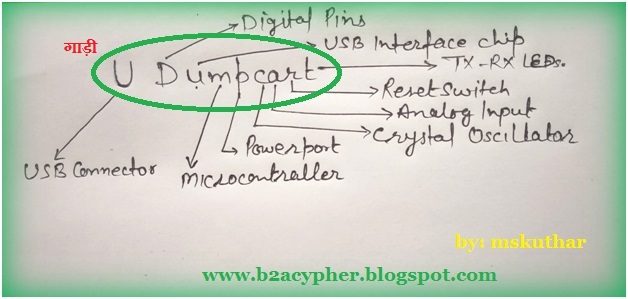
The following are the primary components of the Arduino UNO board:
- USB connector.
- Power port.
- Microcontroller.
- Analog input pins.
- Digital pins.
- Reset switch.
- Crystal oscillator.
- USB interface chip.
- TX RX LEDs.
USB connector:
- This is a printer USB port that is used to load a programme onto the Arduino board from the Arduino IDE. This connection can also be used to power the board.
Power port:
 |
| Power Port |
- An AC-to-DC converter or a battery can be used to power the Arduino board.
- A 2.1mm center-positive plug may be plugged into the board's power port to connect the power supply.
- The Arduino UNO board runs on 5 volts, although it can handle up to 20 volts. If the board is powered at a higher voltage, a voltage regulator (located between the power port and the USB connection) prevents the board from overheating and burning out.
Microcontroller:
 |
| Microcontroller |
- The microcontroller on an Arduino is the key component that does all of the work. When you put an Arduino sketch into the Arduino, it's really stored into the microcontroller chip's memory.
- When the Arduino is powered up or reset after programming, the microcontroller runs or executes the sketch.
Analog input pins:
 |
| Analog Input Pins |
- The analogue input pins on the Arduino UNO board are designated "Analog 0 to 5." These pins can read an analogue sensor's signal, such as a temperature sensor, and convert it to a digital value that the system can interpret.
- Because of their high internal resistance, these pins only monitor voltage and not current. As a result, these pins only carry a modest amount of electricity.
- Despite the fact that these pins are designated analogue and are by default analogue inputs, they can also be utilized for digital input or output.
Digital pins:
 |
| Digital pins |
- These "Digital 0 to 13" pins may be found in the "Digital 0 to 13" section. These pins can function as input or output pins. When used as an output, these pins provide electricity to the components that are attached to them.
- They read the signals from the component linked to them when used as input pins.
- When utilized as output pins, digital pins deliver 40 milliamps of electricity at 5 volts, which is more than enough to light an LED.
- The tilde () sign appears adjacent to the pin numbers on certain digital pins (pin numbers 3, 5, 6, 9, 10, and 11).
- These pins can be used as regular digital pins or for Pulse-Width Modulation (PWM), which replicates analogue output such as fading an LED in and out.
Reset switch:
 |
| Reset switch |
- When this switch is pressed, it sends a logical pulse to the Microcontroller's reset pin, restarting the programme from the beginning.
- If your code doesn't repeat yet you want to test it several times, this might be quite handy.
Crystal oscillator:
 |
| Crystal oscillator |
- This is a 16 million times per second quartz crystal oscillator. The microcontroller executes one operation each tick, such as addition, subtraction, and so on.
USB interface chip:
 |
| USB interface chip |
- Consider it a signal translator. It translates USB signals to a format that an Arduino UNO board can comprehend.
TX RX LEDs:
 |
| TX RX LEDs |
- The letters TX and RX stand for transmit and receive, respectively.
- When the UNO board is transmitting or receiving data, these indicator LEDs flicker.
- You've begun your road toward developing your first IoT prototype now that you've researched the Arduino UNO board.
- In the following post, we'll go through Arduino programming and do some experiments with LEDs and Arduino.
.....Just one thing to remember.....
Tags:
AADUINO IN IOT
arduino UNO
mskuthar
USB connector.
Power port.
Microcontroller.
Analog input pins.
Digital pins.
What is Arduino (Arduino UNO) and how does it works?


