How function works in Arduino IDE?
- The functions enable a programmer to partition a big program into many small-small programs.
- Each of the program performs a different task.
- The functions are designed to repeat a task again and again in a programme.
- A function is a method that returns the code area from where it was called.
Some basic Benefits of Using Functions:
- It improves the code's readability.
- It is in charge of conceptualizing and organizing the programme.
- It lowers the possibilities of making a mistake.
- It reduces the program's size and complexity.
- It prevents the same collection of statements or codes from being repeated.
- It helps us to break down a complicated code or programme into smaller chunks.
- The use of functions in a software simplifies the modification process.
Parts of Function in arduino.
- Setup() and loop() are two popular Arduino procedures that are called automatically in the background.
- Within these functions, the code to be performed is written inside the curly brackets.
- However, there are situations when we need to develop our own functions. Lets discuss.
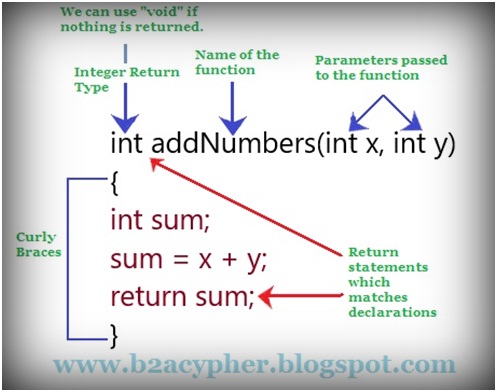
How to declare Function?
 |
| Function Declaration |
- Function return type.
- Function name.
- Function parameters.
Function return type.
- A function requires a return type. For example, the return value of a function can be stored as a variable.
- As a return type, we can use any data type, such as float, char, and so on.
Function name.
- It is made up of a name that is given to the function. It represents the function's actual body.
Function parameters.
- The parameters provided to the function are included in function. The parameters are special variables that are used to pass information to a function.
- Parentheses () and a semicolon must be placed after the function.
- An argument is the data that is supplied to the function.
Example 1: Let's take an example of addition two numbers.
void setup()
{
Serial.begin(9600);
}
void loop() {
int a = 5; // initialization of values to the variables a and b .
int b = 4;
int c;
c = myfunc(a, b); // c will now contains the value 9.
Serial.println(c); // to print the resulted value.
delay(1000); // time delay of 1 second or 1000 milliseconds.
}
int myfunc(int i, int j)
{
int sum;
sum = i + j;
return sum;
}
Example 1: Let's take an example to find given number is even or odd.
int a= 0;
int b;
void setup()
{
Serial.begin(9600);
}
void loop()
{
b = myfunc(a); // we can store the function return value in variable b
Serial.print(a);
Serial.print(" : "); // to separate even or odd text
if (b==1)
{
Serial.println( " Number is even");
}
else
{
Serial.println("Number is odd");
}
a++; // the function will increment and will again run
delay(1000);
}
int myfunc(int d)
{
if (d% 2==0)
{
return 1;
}
else
{
return 0;
}
}
Expected Output:
Tags:
Arduino IDE
b2acypher
ermskuthar
Function Declaration
Functions in Arduino IDE
How function works in Arduino IDE?
mskuthar

